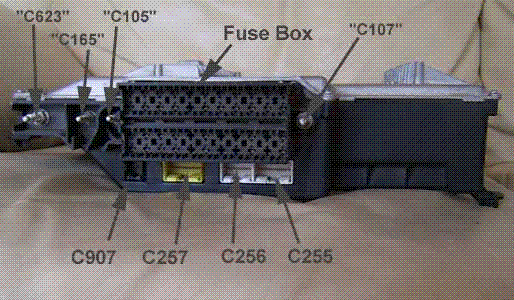
Details of the pin usage for the ECU connector(s).
C907 (up to 99MY) C1277 (from 99MY) 8 pin black or blue |
 |
 |
|
| 1 |
RH front seat serial data bus (clock) |
| 2 |
LH front seat serial data bus (direction) |
| 3 |
LH front seat serial data bus (data) |
| 4 |
LH front seat position |
| 5 |
RH front seat serial data bus (direction) |
| 6 |
RH front seat serial data bus (data) |
| 7 |
LH front seat serial data bus (clock) |
| 8 |
LH front seat position |
C257 (up to 99MY) C1278 (from 99 MY) 20 pin yellow |
| |
| 1 |
Rear screen washer on/off |
| 2 |
RH direction indicators on/off |
| 3 |
Headlamp dipped beam on/off |
| 4 |
Windscreen washer on/off |
| 5 |
Front wipers switch input 2 |
| 6 |
Ignition switch position III |
| 7 |
LH direction indicators on/off |
| 8 |
Headlamp flash |
| 9 |
Side lamps on/off |
| 10 |
Front fog lamp switch telltale |
| 11 |
Wiper time delay |
| 12 |
Headlamps main beam on/off |
| 13 |
Rear wiper on/off |
| 14 |
Front fog lamps on/off |
| 15 |
Front wipers switch input 3 |
| 16 |
Front wipers switch input 1 |
| 17 |
Horn on/off |
| 18 |
Fuel filler flap release on/off |
| 19 and 20 |
Not used |
C256 (up to 99MY) C1280 (from 99MY) 16 pin white |
|
|
| 1 |
Instrument pack serial data bus (direction) |
| 2 |
Instrument pack serial data bus (clock) |
| 3 |
Instrument pack serial data bus (data,duplicate) |
| 4 |
Instrument dimming supply |
| 5 |
Instrument pack serial data bus (earth,duplicate) |
| 6 |
Rear fog lamp switch telltale |
| 7 |
Security LED |
| 8 |
Engine speed (to instrument pack |
| 9 |
Instrument pack serial data bus (direction, duplicate) |
| 10 |
Instrument pack serial data bus (clock, duplicate) |
| 11 |
Instrument pack serial data bus (data) |
| 12 |
Instrument dimming supply |
| 13 |
Ignition switch position 1 |
| 14 |
Instrument pack serial data bus (earth) |
| 15 |
Instrument pack audible warning |
| 16 |
Road speed (to instrument pack) |
C255 (up to 99MY) C1279 (from 99MY) 20 pin white |
|
|
| 1 |
Rear fog lamps on/off |
| 2 |
Not used |
| 3 |
Key in ignition switch |
| 4 |
Clutch pedal depressed (manual models) |
| 5 |
Not used |
| 6 |
RH front seat heater on/off |
| 7 |
Hazard warning lamp telltale |
| 8 |
Diagnostic K line |
| 9 |
Alternator charging (engine running) |
| 10 |
Road speed (to ATC ECU) |
| 11 |
Rear screen heater on/off |
| 12 |
Immobiliser passive coil supply |
| 13 |
Hazard warning on/off |
| 14 |
Cruise Control on/off |
| 15 |
LH front seat heater on/off |
| 16 |
Not used |
| 17 |
Diagnostic L line |
| 18 |
Power to cruise control ECU, switch telltale and inverter/converter |
| 19 |
Not used |
| 20 |
Road speed (to cruise control ECU) |
C325 (up to 99MY) C1283 (from 99MY) 18 pin grey |
 |
 |
|
| 1 |
LH rear fog lamp |
| 2 |
LH reverse lamp |
| 3 |
RH rear fog lamp and trailer fog lamp |
| 4 |
RH rear direction indicator lamp |
| 5 |
Auxiliary power supply (serial amplifier) |
| 6 |
RH rear door superlocking |
| 7 |
Rear screen wiper motor |
| 8 |
RH rear door locking |
| 9 |
RH reverse lamp |
| 10 |
RH tail lamp and trailer RH tail lamp |
| 11 |
RH rear, front and loadspace courtesy lamps |
| 12 |
RH brake lamp and trailer brake lamps |
| 13 |
Centre High Mounted Stop Lamp (CHMSL) |
| 14 |
Trailer LH direction indicator lamp |
| 15 |
Trailer RH direction indicator lamp |
| 16 |
Number plate lamps |
| 17 |
Battery power supply (front, RH rear and loadspace courtesy lamps, tail gate central locking, alarm RF receiver) |
| 18 |
RH rear door unlocking |
C323 (up to 99MY) C1284 (from 99MY) 12 pin grey |
|
|
| 1 |
Ignition power supply (rear view mirror dip) |
| 2 |
Battery power supply (RH front door outstation) |
| 3 |
Trailer LH tail lamp |
| 4 |
Battery power supply (RH rear ICE amplifier) |
| 5 |
RH rear window down |
| 6 |
RH rear door marker (puddle) lamp |
| 7 |
Fuel filler flap release |
| 8 |
RH rear window anti trap supply |
| 9 |
Sunroof anti trap supply |
| 10 |
RH rear window up |
| 11 |
RH rear window switch illumination |
| 12 |
Battery power supply (RH front door outstation (window)) |
C324 (up to 99MY) C1292 (from 99MY) 4 pin natural |
|
|
| 1 |
Sunroof backwards |
| 2 |
Rear screen heater |
| 3 |
Sunroof forwards |
| 4 |
Ignition power supply (sun visor) |
C120 (up to 99MY) C1281 (from 99MY) 14 pin yellow |
|
|
| 1 |
Ignition power supply (SRS DCU) |
| 2 |
Alarm sounder |
| 3 |
LH front fog lamp |
| 4 |
Rear screen washer pump |
| 5 |
LH front side lamp |
| 6 |
RH (direction indicator) side repeater lamp |
| 7 |
Horn |
| 8 |
LH headlamp main bean (auxiliary bulb) |
| 9 |
Ignition switch position II |
| 10 |
LH headlamp main beam (duel element bulb |
| 11 |
LH headlamp dipped beam |
| 12 |
LH front direction indicator lamp |
| 13 |
Windscreen washer pump |
| 14 |
LH (direction indicator) side repeater lamp |
C113 (up to 99MY) C1289 (from 99MY) 10 pin yellow |
|
|
| 1 |
RH headlamp main beam (dual element bulb |
| 2 |
Starter motor on |
| 3 |
RH headlamp dipped beam |
| 4 |
RH front direction indicator lamp |
| 5 |
RH head lamp main beam (auxiliary bulb) |
| 6 |
Headlamp wash/wipe |
| 7 |
Front wipers fast speed |
| 8 |
Front wipers slow speed |
| 9 |
RH front side lamp |
| 10 |
RH front fog lamp |
C626 (up to 99MY) C1287 (from 99MY) 20 pin black |
|
|
| 1 |
EAT ECU diagnostic L line (automatic models) |
| 2 |
Centre console serial data bus (direction) |
| 3 |
Transfer box high range |
| 4 |
Transfer box neutral |
| 5 |
Shift mode status 2 (automatic models) |
| 6 |
Transfer box over temperature |
| 7 |
Transfer box low range |
| 8 |
Gear position switch X signal (automatic models) |
| 9 |
Gear position switch Y signal (automatic models) |
| 10 |
Not used |
| 11 |
Engine speed (to EAT ECU (automatic models)) |
| 12 |
EAT ECU diagnostic K line (automatic models) |
| 13 |
Centre console serial data bus (clock) |
| 14 |
Centre console serial data bus (data) |
| 15 |
Not used |
| 16 |
Shift mode status 1 (automatic models) |
| 17 |
Handbrake on/off |
| 18 |
Gear position switch Z signal (automatic models) |
| 19 |
Seatbelt latched/unlatched |
| 20 |
Clutch pedal depressed (manual diesel models); ECM (automatic diesel models); gear selector lever park/neutral (NAS V8 models) |
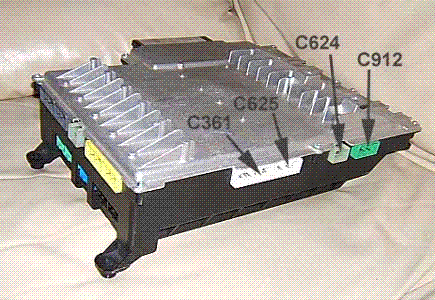
C362 (up to 99MY) C1286 (from 99MY) 16 pin black |
|
|
| 1 |
LH front door serial data bus (data) |
| 2 |
LH rear window anti-trap 2 |
| 3 |
LH front window anti-trap 2 |
| 4 |
LH rear door open |
| 5 |
LH rear window anti-trap 1 |
| 6 |
Movement detected (by volumetric sensor) |
| 7 |
LH rear window down |
| 8 |
LH door mirror position |
| 9 |
LH front door serial data bus (direction) |
| 10 |
LH front door serial data bus (clock) |
| 11 |
LH front window anti-trap 1 |
| 12 and 13 |
Not used |
| 14 |
LH rear window up |
| 15 |
Volumetric sensor power supply |
| 16 |
LH rear window anti-trap power supply |
C326 (up to 99MY) C1285 (from 99MY) 20 pin blue |
|
|
| 1 |
Rear wiper park |
| 2 |
Front courtesy lamp switch |
| 3 |
Tail door open |
| 4 |
Sunroof anti-trap 1 |
| 5 |
RH rear window anti-trap 1 |
| 6 |
Radio cassette remote on/off |
| 7 |
RH front window anti-trap 1 |
| 8 |
RH rear window down |
| 9 |
RH front door serial data bus (clock) |
| 10 |
RH front door serial data bus (direction) |
| 11 |
Sunroof closed |
| 12 |
RH door mirror position |
| 13 |
RH rear door open |
| 14 |
Sunroof anti-trap 2 |
| 15 |
RH rear window anti-trap 2 |
| 16 |
RH front window anti-trap 2 |
| 17 |
RH rear window up |
| 18 |
Not used |
| 19 |
RH front door serial data bus (data) |
| 20 |
Reverse selected |
C114 (up to 99MY) C1289 (from 99MY) 20 pin green |
|
|
| 1 |
Low screen wash fluid level |
| 2 |
inertia switch tripped |
| 3 |
Front wiper park switch |
| 4 |
Not used |
| 5 |
Engine warning lamp |
| 6 |
Not used |
| 7 |
Low engine oil pressure |
| 8 |
Air suspension wade warning lamp |
| 9 |
Air suspension messages 1 |
| 10 |
Fuel level |
| 11 |
Road speed |
| 12 |
ETC messages and warning lamp |
| 13 |
Not used |
| 14 |
Bonnet open |
| 15 |
Alternator charge |
| 16 |
Low brake fluid level |
| 17 |
Not used |
| 18 |
Air suspension messages 2 |
| 19 |
Engine coolant temperature |
| 20 |
Engine speed |
C112 (up to 99MY) C1288 (from 99MY) 16 pin green |
|
|
| 1 |
Not used |
| 2 |
Parking brake on |
| 3 |
Side/Tail door open |
| 4 |
Gearbox oil temp (Automatic) |
| 5 |
Security code |
| 6 and 7 |
Not used |
| 8 |
Ing. Switch Pos.1 |
| 9 |
Engine speed |
| 10 |
ABS warning lamp/message |
| 11 |
Brakes on |
| 12 |
Not used |
| 13 |
Road speed |
| 14 |
Cat convertor overheat (Japan V8) or glowplug warning (Diesel) |
| 15 |
Not used |
| 16 |
Fuel level (V8) |
C361 (up to 99MY) C1290 (from 99MY) 18 pin white |
 |
|
| 1 |
Auxiliary power supply (telephone) |
| 2 |
LH rear window up |
| 3 |
LH rear door marker (puddle) lamp |
| 4 |
Battery power supply (trailer) |
| 5 |
Trailer reverse lamps |
| 6 |
Battery power supply (LH rear courtesy lamp, LH loadspace lamp, sub-woofer amplifier and LH rear ICE amplifier) |
| 7 |
Battery power supply (LH front door outstation, window) |
| 8 |
Battery power supply (LH front door outstation) |
| 9 |
LH rear courtesy lamp |
| 10 |
LH rear window down |
| 11 |
Not used |
| 12 |
LH tail lamp |
| 13 |
LH rear door unlocking |
| 14 |
LH rear direction indicator lamp |
| 15 |
LH rear door superlocking |
| 16 |
Illumination (LH rear window switch) |
| 17 |
LH brake lamp |
| 18 |
LH rear door locking |
C625 (up to 99MY) C1290 (from 99MY) 12 pin white |
|
|
| 1 |
Ignition power supply (transfer box ECU) |
| 2 |
Ignition power supply (gear selector lever (automatic models)) |
| 3 |
Ignition power supply (EAT ECU (automatic models)) |
| 4 |
Transfer box neutral low link |
| 5 |
Auxiliary power supply (cigar lighter) |
| 6 |
Shift interlock solenoid (automatic models) |
| 7 |
Battery power supply (EAT ECU (automatic models)) |
| 8 |
Battery power supply (centre console switch pack) |
| 9 and 10 |
Not used |
| 11 |
Interior illumination (centre console switch pack, cigar lighter and gear selector lever (automatic models)) |
| 12 |
Rear footwell lamps |
C624 (up to 99MY) C1293 (from 99MY) 4 pin natural |
|
|
| 1 and 2 |
Not used |
| 3 |
Battery power supply (transfer box ECU) |
| 4 |
Not Used |
C912 (up to 99MY) C0877 (from 99MY) 12 pin green |
|
|
| 1 |
RH front seat heater |
| 2 |
LH front seat heater |
| 3 |
RH front seat enable |
| 4 |
LH front seat earth |
| 5 |
RH front seat lumbar support |
| 6 |
LH front seat lumbar support |
| 7 |
LH front seat battery power supply 2 |
| 8 |
LH front seat battery power supply 1 |
| 9 |
LH front seat enable |
| 10 |
RH front seat earth |
| 11 |
RH front seat battery power supply 1 |
| 12 |
RH front seat battery power supply 2 |
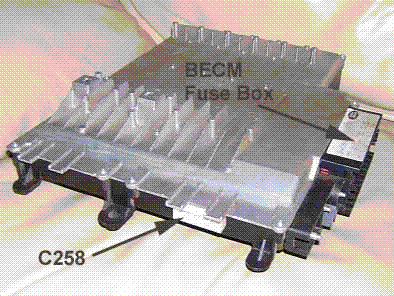
C258 (up to 99MY) C1276 (from 99MY) 10 pin white |
 |
|
| 1 |
Cruise control pump supply |
| 2 |
Illumination (clock, facia, switches, ATC ECU, instrument pack and radio cassette player) |
| 3 |
Illumination (front footwell lamps and ignition switch) |
| 4 |
Brakes on/off |
| 5 |
Illumination (glovebox lamp) |
| 6 |
Auxiliary power supply (ATC ECU and radio cassette player) |
| 7 |
Battery power supply (clock, radio cassette palyer and instrument pack) |
| 8 |
Ignition switch position II |
| 9 |
Ignition power supply (brakes, PAS, air suspension switches and ATC ECU) |
| 10 |
Ignition key inhibit - up to 97.5MY |
 SM022 - BECM (P38 NRR) - Diagnostic Capabilities (Read Fault Codes) SM022 - BECM (P38 NRR) - Diagnostic Capabilities (Read Fault Codes) |
Although this function is entitled read fault codes, it actually gives you four choices for special functions of the BECM. These functions allow checking to see if the BECM has performed a valid fob code comparison since its memory was last reset and that all outstations have reported to the BECM since its memory was last reset.
- Read RF memory: This will confirm if the BECM has received a valid radio frequency (RF) transmission since it was reset with the clear RF memory function. Although a key fob may transmit it may not be sending the same Fob code as that stored in the BECM. This test confirms that the correct fob signal has been received.
- Read outstation memory: The BECM has up to six outstations with which it communicates; this test confirms correct communication with each one. When correct communication occurs with each outstation, it is logged in this memory and stays that way, even if the outstation goes faulty later. This memory must then be reset with the CLEAR OUTSTATION MEMORY command (which should be performed with the ignition off) then, after turning the ignition on for 5 seconds, turn it off and use this function to read the memory. It will show you, which outstation has not reported in. Please note that where electric memory seats are not fitted there will be a report of no communication from that outstation, note the term memory as opposed to non memory which does not have an outstation.
- Clear RF memory: To be used in conjunction with the READ RF MEMORY function. This resets the memory, which stays reset until a valid fob code has been received by the BECM. These then stay set until reset with this function.
- Clear outstation memory: To be used in conjunction with the READ OUTSTATION MEMORY function. This resets the memory to enable new faults to be logged. It is best done with the ignition turned off.
|
| SM022 - BECM (P38 NRR) - Diagnostic Capabilities (Clear Fault Codes) |
Although this function is entitled clear fault codes, it actually gives you four choices for special functions of the BECM. These functions allow clearing the outstation memory and RF memory.
- Clear RF memory: To be used in conjunction with the READ RF MEMORY function. This resets the memory, which stays reset until a valid fob code has been received by the BECM. These then stay set until reset with this function.
- Clear outstation memory: To be used in conjunction with the READ OUTSTATION MEMORY function. This function should be performed with the ignition off. After turning the ignition on for 5 seconds, turn it off and use read outstation memory function to read the memory. It will show you, which outstation has not reported in. Please note that where electric memory seats are not fitted there will be a report of no communication from that outstation, note the term memory as opposed to non memory which does not have an outstation.This resets the memory to enable new faults to be logged. It is best done with the ignition turned off.
|
| SM022 - BECM (P38 NRR) - Diagnostic Capabilities (Settings) |
| Values, configuration settings, and other stored information which can be read from the ECU, edited and then rewritten back. Read settings can also be stored as a standard HTML page for reference. These pages can then later be re loaded and re written back to the ECU. Please note that some values may be read only due to the fact that they are supplied from the ECU’s ROM or are internally calculated.
GENERAL SETTINGS
- Alarm: The alarm can be either enabled or disabled if required. Disabling the alarm prevents the alarm from arming and stops all audible and visual activity whenever the vehicle is locked or unlocked. It does not affect the immobilization.
- Alarm lights: This changes the method of visual output from the BECM used for the alarm activated / triggered.
- Alarm noise: Different markets have different options of alarm sounding when the alarm is activated / triggered.
- Arm/disarm: Changes the method of visual notification of alarm arming and disarming.
- BECM Status: The BECM has an electronic lock that is designed to prevent access to some of its contents. All BECM's are locked in this way at the vehicle factory after they are programmed with the information specific to the vehicle they have been fitted in. However, replacement BECM's are supplied unlocked and all data can be readily accessed and changed up until the point when the unit is locked. This is currently an irreversible process without special module SM035 so it is important to check the correctness of all information stored in the BECM before considering locking it. The status of the lock has no effect on any other operation of the BECM (i.e. it is perfectly acceptable to leave the status of the BECM unlocked for normal vehicle usage). Attention, if the BeCM is unlocked there might be problems in communicating with HEVAC in diagnostic mode. More details in the HEVAC help page.
- Cat amplifier / heater: For markets where catalyst amplifiers and heaters are used, mainly Japan.
- Cruise: This indicates if cruise control is fitted or not.
- Daylight running: Either headlamps or sidelights can be selected as the daytime running lights or the function can be disabled.
- Drive: Denotes left hand drive (LHD) or right hand drive (RHD).
- EKA: For the markets that do not use the Emergency Key Access (EKA) system.
- EKA number: This is the Emergency Key Access (EKA) Number for this vehicle. Only available on unlocked BECM's (see BECM STATUS). Even if the EKA function is disabled (see PASSIVE EKA) and therefore not used, each BECM still has a number programmed into it. The number has to be 4 characters long, each character can be a number between 1 and 6, and the four numbers cannot be all the same.
- Immobilisation Code: The immobilization code is stored in both the engine management and BECM ECU's. If a valid code is received from the engine ECU compared to the one in the BECM when the key is turned, the engine will start. If the Engine ecu, the BECM or the LOCKSET in the vehicle are replaced then the 2 codes will not match and the engine will not start. It will then become neccessary to synchronise the two codes between BECM and engine ecu. For the EDC and Motronic systems you need to open the engine ecu settings page and make a note of the code displayed (EDC - EMS CODE) (MOTRONIC - IMMOBILISATION CODE). Then open the BECM settings page and place this number in the IMMOBILISATION CODE box and click Write settings. For GEMS ecu any number between 0 and 65535 can be input into the IMMOBILISATION CODE box in the BECM, Click on Write settings and then go to GEMS - OTHER and SECURITY LEARN MODE to force the code from the BECM to the GEMS ecu. A valid number for GEMS is between 0 and 65535.
- Engine: Select between the later Motronic Petrol engine management which is fitted after 1999 and can be distinguished by the overlapping sausage effect of the intake plenum on the top of the engine. GEMS petrol engine management fitted before 1999 which can be distinguished by the flat topped intake plenum with the engine capacity shown on the top of the engine or the Diesel EDC engine management.
- FOB code: For security this information is only available to be read or programmed on unlocked BECM's (see BECM STATUS). The fob code is a 3-part code, which uniquely identifies the family of key fobs (key 1, key 2, etc.) that go with this vehicle. Any key Fob, when pressed, transmits its unique electronic ID code (FOB CODE) in an encrypted format. The BECM of any vehicle within range of that key fob decrypts the received transmission and compares the FOB CODE that was received, against the FOB CODE that is stored here. If the two match, it will accept the key as valid and perform the relevant task (lock, unlock, send mobilize signal to engine ECU, etc). This FOB CODE is derived from converting the manufacturer's Lockset Bar code. This is a 14 digit alphanumeric number, which is printed on a label that accompanies every new key fob or lockset. When the vehicle was assembled at the factory and was first fitted with its new lock set, the Lockset Bar code was recorded along with the vehicles VIN number; this can be obtained from your local dealership by quoting the Vehicle's VIN number. If the Lockset Bar code given by the dealer is no longer correct for the vehicle (due to an earlier replacement of the lockset and where the kept records were not updated), there is then no alternative but to replace the lockset and use the Lockset bar code that comes with it. When you have the Lockset Bar code, do not attempt to enter this directly, but give this to the help desk who will then convert the Lockset Bar code into a the 3-part FOB CODE. This FOB CODE is then entered here. The FOB CODE can only be obtained by this method.
- Fog lights: This denotes whether front fog lights are fitted to the vehicle or not.
- Gearbox: This denotes whether the gearbox is manual or automatic.
- Immobiliser: Turns on the passive (self) immobilize function in markets which use it.
- Key warning: When enabled, the warning gong will sound continuously whilst the keys are in the ignition and the ignition is turned off.
- Lazy locking: Changes the situations in which lazy locking is allowed.
- Language: This defines the language used by the vehicle to signal messages in its information display. The last option refers to a translation book allowing any other language to be added in look up form.
- Market: This is the flag that the BECM uses to see if it is used / configured. When a BECM is brand new it is not set and the display on the instrument pack will only show the message "Market not set". To stop this happening this value must be changed to set.
- Mislock: Changes the method of notification of error on alarm arming between using the interior light or the alarm sounder.
- Moisture detect: This enables the moisture detected warning facility.
- Range lamp: This is used to enable or disable the hi or low range selector back lamp function.
- Service light: In certain markets, legislation requires there to be a reminder light to service the engine after a certain distance has been travelled. Adding this feature also requires the bulb to be fitted to the service reminder position in the instrument pack. This will then illuminate (other than in bulb test) when the vehicle travels over 50,000 miles or 80,500 km from whenever the function was enabled.
- Sounder: Different markets have different options of alarm sounders fitted that require different outputs from the BECM to operate. This allows correct selection.
- Speed limit: This function changes the maximum limit between 100 or 120 at which the over speed warning function built in to the trip computer may be set.
- Sunroof This denotes whether an electric sunroof is fitted to the vehicle or not.
- UK police: This selection allows the BECM to be configured to police specification. Setting this without the required rewiring of the vehicle and the addition of switches, may have undesirable effects.
- Trip computer: This denotes whether a trip computer is installed in the vehicle or not.
- VIN: The last six digits of the Vehicle Identification Number (VIN) that is unique to each vehicle. The designation for the remainder of the VIN is detailed in the relevant manual. An invalid format VIN number will not be accepted. The VIN cannot be changed on a Locked BeCM
- Microprocessor firmware: The firmware of the microprocessor fitted in BECM. This number can be read as well on the label.
- Software level: The software level of the BECM. This number can be read as well on the label.
- Window cancel: Some markets allow operation of the windows and sunroof for a period of time after the ignition is turned off and the door is opened; some have immediate cancellation of operation when the ignition is turned off and others have no cancellation at all. This allows the desired selection.
- Wiper speed: These settings enables the windscreen wiper speed functions.
- 1 touch: This specifies which windows have one touch functionality.
- Date of build: The date the BECM was built in DD MM YYYY format. ECU accepts only valid values: day between 1 and 31, month between 1 and 12, year between 1991 and 2010.
- Mileage: The value shown on the odometer display (sometimes Kilometres). This value can not be altered
DISARM
- Disarm BeCM: This only applies to a BeCM with a PAM version of V36 or later. This is printed on the label on the BeCM above the fuses. For a vehicle with EKA enabled, is requred to type in the EKA code. The function will disarm the BECM.
|
| SM022 - BECM (P38 NRR) - Diagnostic Capabilities (Inputs) |
Realtime live display of the information the electronic control unit of the selected vehicle system is currently deriving from its input sensors.
MIRROR AND WINDOW - CENTRE CONSOLE SWITCH PACK
- Heated rear window: This shows the current logic status of the heated rear window input on pin 11 of C255.
- Sunroof forward: This shows the current logic status of the centre console's sunroof forward switch (when fitted).
- Sunroof backward: This shows the current logic status of the centre console's sunroof backward switch (when fitted).
- Sunroof closed: This shows the current logic status of the centre console's sunroof closed switch (when fitted). This switch is built into the motor and if the motor is rotated whilst physically disconnected from the sunroof mechanism, the switch will become not synchronised to the sunroof's position. In order to re-synchronise this you must first connect the motor and use the forward and backward switches to move the sunroof to the closed position manually, stopping at the correct point then physically disengage the motor and turn it until the exact point when the switch closes, then refit the motor.
- Inhibit rears: This shows the current logic status of the rear window inhibit switch.
- Rear right window up: This shows the current logic status of the centre console's rear right window up switch.
- Rear right window down: This shows the current logic status of the centre console's rear right window down switch.
- Rear left window up: This shows the current logic status of the centre console's rear left window up switch.
- Rear left window down: This shows the current logic status of the centre console's rear left window down switch.
- Front right window down: This shows the current logic status of the centre console's front right window down switch.
- Front right window up: This shows the current logic status of the centre console's front right window up switch.
- Front left window down: This shows the current logic status of the centre console's front left window down switch.
- Front left window up: This shows the current logic status of the centre console's front left window up switch.
- Mirror joystick up: This shows the current logic status of the centre console's electric mirror adjustment joystick up switch.
- Mirror joystick down: This shows the current logic status of the centre console's electric mirror adjustment joystick down switch.
- Mirror joystick right: This shows the current logic status of the centre console's electric mirror adjustment joystick right switch.
- Mirror joystick left: This shows the current logic status of the centre console's electric mirror adjustment joystick left switch.
- Mirror right left select: This shows the current logic status of the centre console's electric mirror adjustment right or left selection switch.
- Rear right window down: This shows the current logic status of the right rear door's rear right window down switch.
- Rear right window up: This shows the current logic status of the centre console's rear right window up switch.
- Rear left window down: This shows the current logic status of the centre console's rear left window down switch.
- Rear left window up: This shows the current logic status of the centre console's rear left window up switch.
DOOR AND LOCKS
- Ignition key in: This shows the current logic status of the key in ignition switch.
- Ignition key stage 1: This shows the current logic status of the ignition switch stage I.
- Ignition key stage 2: This shows the current logic status of the ignition switch stage II.
- Ignition key stage 3: This shows the current logic status of the ignition switch stage III (starting).
- Front right door ajar: This shows the current logic status of the right front door ajar switch.
- Front left door ajar: This shows the current logic status of the left front door ajar switch.
- Rear right door ajar: This shows the current logic status of the right rear door ajar switch.
- Rear left door ajar: This shows the current logic status of the left rear door ajar switch.
- Right central door locking: This shows the current logic status of the front right central door locking (CDL) switch.
- Left central door locking: This shows the current logic status of the front left central door locking (CDL) switch.
- Right key switch: This shows the current logic status of the front right door key switch (Right hand drive).
- Left key switch: This shows the current logic status of the front left door key switch (Right hand drive).
- Bonnet: This shows the current logic status of the bonnet open switch.
- Tailgate: This shows the current logic status of the tailgate open switch.
- Fuel flap: This shows the current logic status of the fuel flap release switch.
LIGHTS
- Front/Rear fog lights: This shows the current logic status of the front/rear fog light switch (when fitted).
- Headlights: This shows the current logic status of the headlight switch.
- Sidelights: This shows the current logic status of the sidelight switch.
- Right indicator: This shows the current logic status of the right indicator switch.
- Left indicator: This shows the current logic status of the left indicator switch.
- Panel dimmer up: This shows the current logic status of the increase brightness side of the panel dimmer switch.
- Panel dimmer down: This shows the current logic status of the decrease brightness side of the panel dimmer switch.
- Dipped/mainbeam: This shows the current logic status of the dipped to main beam change over switch.
- Mainbeam flash: This shows the current logic status of the main beam flash switch.
- Hazards: This shows the current logic status of the hazard switch.
- Courtesy light: This shows the current logic status of the courtesy light switch.
WASHWIPE AND SOUNDERS
- Wiper delay value: This shows the current value of the front wash wipe systems wiper delay resistor.
- Front Wiper Park: This shows the current logic status of the front windscreen wipers self park switch.
- Low screen wash: This shows the current logic status of the low fluid level switch for the windscreen washer bottle.
- Horn: This shows the current logic status of the horn button.
- S1 mist: This shows the current logic status of the front wash wipe systems S1 mist switch.
- S2 slow wipe: This shows the current logic status of the front wash wipe systems S2 slow wipe switch.
- S3 fast wipe: This shows the current logic status of the front wash wipe systems S3 fast wipe switch.
- Front wash: This shows the current logic status of the front windscreen wash switch.
- Rear Wiper Park: This shows the current logic status of the rear screen wipers self park switch.
- Rear wiper: This shows the current logic status of the rear wiper switch.
- Rear wash: This shows the current logic status of the rear screen wash switch.
DASHBOARD
- Fuel level: This BECM input is not a high or low signal from a switch but a varying voltage from a resistive sensor. The BECM puts this incoming voltage through an internal analogue to digital converter, which gives a numerical value between 0 and 255 which equates to how high the voltage is on the input.
- Footbrake: This shows the current logic status of the foot brake switch.
- Handbrake: This shows the current logic status of the handbrake switch.
- Inertia cut-off: This shows the current logic status of the inertia cut-off switch which trips in the event of an impact. This switch is located behind the right hand kick panel but can be accessed through a small flap in this panel.
- Ultrasonics: This shows the current logic status of the ultrasonic detectors output.
- Seatbelt buckle: This shows the current logic status of the driver's side seat belt buckle switch which is only fitted in some countries.
- Cruise switch: This shows the current logic status of the cruise controls on/ off switch.
- ABS pressure: This shows the current logic status of the ABS pressure switch.
- Brake fluid pressure: This shows the current logic status of the ABS pressure switch, which doubles up with the brake fluid level switch.
- ABS warning: This shows the current logic status of the ABS warning message output.
- ETC warning: This shows the current logic status of the Electronic Traction Controls (ETC) warning message output.
- EAS warning 1/2/3: This shows the current logic status of one of the Electronic Air Suspension (EAS) message signalling outputs.
SEATS
- Left heated seat: This shows the current logic status of the left heated seat request line from the Hevac ECU which inputs to the BECM on pin 15.
- Left seat forward: This shows the current logic status of the user control which moves the entire left electric memory seat forward (when fitted).
- Left seat back: This shows the current logic status of the user control which moves the entire left electric memory seat backward (when fitted).
- Left squab front up: This shows the current logic status of the user control which raises the front of the left electric memory seats squab cushion (when fitted).
- Left squab front down: This shows the current logic status of the user control which lowers the front of the left electric memory seats squab cushion (when fitted).
- Left squab rear up: This shows the current logic status of the user control which raises the rear of the left electric memory seats squab cushion (when fitted).
- Left squab rear down: This shows the current logic status of the user control which lowers the rear of the left electric memory seats squab cushion (when fitted).
- Left backrest up: This shows the current logic status of the user control which moves the left electric memory seats backrest forward (when fitted).
- Left backrest down: This shows the current logic status of the user control which moves the left electric memory seats backrest backward (when fitted).
- Left headrest up: This shows the current logic status of the user control which moves the left electric memory seats headrest up (when fitted).
- Left headrest down: This shows the current logic status of the user control which moves the left electric memory seats headrest down (when fitted).
- Left memory 1: This shows the current logic status of the user button which in conjunction with the memory store button, stores the left electric memory seat's current motor positions of all adjustments in memory 1 (when fitted).
- Left memory 2: This shows the current logic status of the user button which in conjunction with the memory store button, stores the left electric memory seat's current motor positions of all adjustments in memory 2 (when fitted).
- Left memory store: This shows the current logic status of the user button which in conjunction with one of the memory number buttons, stores the left electric memory seat's current motor positions of all adjustments in the selected memory (when fitted).
- Right heated seat: This shows the current logic status of the right heated seat request line from the Hevac ECU which inputs to the BECM on pin 15.
- Right seat forward: This shows the current logic status of the user control which moves the entire right electric memory seat forward (when fitted).
- Right seat back: This shows the current logic status of the user control which moves the entire right electric memory seat backward (when fitted).
- Right squab front up: This shows the current logic status of the user control which raises the front of the right electric memory seat's squab cushion (when fitted).
- Right squab front down: This shows the current logic status of the user control which lowers the front of the right electric memory seat's squab cushion (when fitted).
- Right squab rear up: This shows the current logic status of the user control which raises the rear of the right electric memory seat's squab cushion (when fitted).
- Right squab rear down: This shows the current logic status of the user control which lowers the rear of the right electric memory seat's squab cushion (when fitted).
- Right backrest up: This shows the current logic status of the user control which moves the right electric memory seat's backrest forward (when fitted).
- Right backrest down: This shows the current logic status of the user control which moves the right electric memory seat's backrest backward (when fitted).
- Right headrest up: This shows the current logic status of the user control which moves the right electric memory seat's headrest up (when fitted).
- Right headrest down: This shows the current logic status of the user control which moves the right electric memory seat's headrest down (when fitted).
- Right memory 1: This shows the current logic status of the user button which in conjunction with the memory store button, stores the right electric memory seat's current motor positions of all adjustments in memory 1 (when fitted).
- Right memory 2: This shows the current logic status of the user button which in conjunction with the memory store button, stores the right electric memory seat's current motor positions of all adjustments in memory 2 (when fitted).
- Right memory store: This shows the current logic status of the user button which in conjunction with one of the memory number buttons, stores the right electric memory seat's current motor positions of all adjustments in the selected memory (when fitted).
ENGINE AND GEARBOX
- Engine temperature: This BECM input is not a high or low signal from a switch but a varying voltage from a resistive sensor. The BECM puts this incoming voltage through an internal analogue to digital converter which gives a numerical value between 0 and 255 which equates to how high or low the voltage is the resulting number is displayed here.
- Oil pressure: This shows the current logic status of the low oil pressure warning switch.
- Check engine (MIL): This shows the current logic status of the engine ECU'S check engine warning lamp output.
- Alternator D+: This shows the current logic status of the alternator's D+ output.
- Gearbox overheat: This shows the current logic status of the gearbox's overheat warning output.
- Gearbox MES1: This shows the current logic status of one of the Auto gearbox's operating mode outputs.
- Gearbox MES2: This shows the current logic status of one of the Auto gearbox's operating mode outputs.
- Transfer box overheat: This shows the current logic status of the transfer gear box's overheat warning output.
- Transfer box low range: This shows the current logic status of one of the transfer gear box's range state outputs.
- Transfer box hi range: This shows the current logic status of one of the transfer gear box's range state outputs.
- Autobox Z/Neutral: This shows the current logic status of the Z switch (for automatic transmission) or for the gear stick in neutral switch (for manual transmission).
- Autobox Y: This shows the current logic status of the Y switch for automatic transmission vehicles. It is not used with manual transmission vehicles.
- Autobox X/Reverse: This shows the current logic status of the X switch (for automatic transmission) or for the gear stick in reverse gear switch (for manual transmission).
- Clutch: This shows the current logic status of the clutch switch.
|
| SM022 - BECM (P38 NRR) - Diagnostic Capabilities (Outputs) |
A selection of functions and outputs that can be tested. Each output has the option ON and OFF in order to start and stop testing. BECU has control over the following features:
- Instrument cluster lamps: Tests all the lamps and LEDs on the instrument panel.
- Mirrors: Can be moved up, down, to the left or to the right, and the heater can be turned on and off.
- Windows: Can be moved up and down. Caution: Make sure that nothing obstructs the window.
- Screen heater: Can turn the heater on and off.
- Sunroof: Can be opened or closed. Caution: Make sure that nothing obstructs the sunroof.
- Instrument pack bulbs: Tests all the lamps and LEDs on the instrument pack.
- Dashboard lights: Tests the dashboard lamps.
- Lights: Tests vehicle's lights.
- Wash and Wipe: Tests the wipers for the windscreen and headlamp.
- Sounders: Tests all the sounders (horn, alarm, internal warning buzzer).
- Locking: Test the locks for all doors. WARNING: Leaving the solenoids energized for long can produce damages.
- Ignition stage II: This function turns the power on to all systems which are driven by stage II ignition.
- Ignition stage III: This function engages the output, which drives the vehicle's Starter Motor and should only be used when it has been checked that it is safe to do so. The Engine may start if it is able to do so, and the vehicle may move if it is in gear. Please stand well clear to avoid any possible injuries.
- Fuel and temperature gauge: Tests the gauges. The needle moves quite slowly as it is damped, and it can take 10-30 seconds before any change can be seen. To speed up the procedure, after clicking on the function and while it is still running, remove fuse F1 for one second and replace it. The instrument pack will then reset and on re power move the needle to the requested place immediately.
- Seat control: This function works only on electric memory seats. Turns on and off the heater, moves the seat forward and rearward, raise and lower the squab cushion.
|
| SM022 - BECM (P38 NRR) - Diagnostic Capabilities (Other) |
Choice of functions that can be performed.
- Light output sequence: This function gives quite a long sequence of turning on and off external lights it is intended for unattended running demonstrations and is very long. It cannot be stopped other than by vehicle disconnection.
- Reset service reminder: This only works on NAS or Canadian specification vehicles where the function is normally enabled. This function resets the engine service reminder warning lamp, which illuminates constantly after the vehicle has travelled more than approximately 50,000 miles or 80,500 kilometres.
- Instrument odometer synchronize: This forces the odometer in the instrument cluster to synchronise or update to display the value stored in the BECM if that value is higher. It stops the display showing ODO UPDATE. The BECM automatically updates to the same value as that stored in any instrument pack that is fitted if the value is higher than the one the BECM already contains.
|
| SM022 - BECM (P38 NRR) - Diagnostic Capabilities (Miscellaneous) |
BECM Sleep Test
This test will determine if the BECM goes to sleep properly or it will stay awake.
- Sit in the vehicle in the driver seat with all the doors closed.
- Wait until the interior light switches off.
- Switch on the ignition.
- Switch off the ignition.
- Open the driver door and leave the door open for the reminder of the test.
- Switch off the interior lights by pressing the button for 4 seconds. On the message centre you can observer the message "Lights off".
- The message centre displays "Ignition key in" for approximately 2 minutes.
- If the display goes blank after the two minutes, then the BECM is gone to sleep, if the display is still on, then the BECM did not go to sleep.
|
|
 BECM (P38 NRR) - System Overview
 BECM (P38 NRR) - Known Fitments
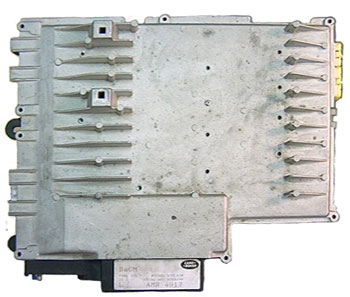
 BECM (P38 NRR) - Physical Details